![]()
68 Exam Questions for CKA Updated Versions With Test Engine
Pass CKA Exam with Updated CKA Exam Dumps PDF 2024
Linux Foundation CKA (Certified Kubernetes Administrator) Program Exam is a certification exam designed to test the skills and knowledge of professionals working with Kubernetes. CKA exam is designed to assess a candidate's ability to deploy, configure, and manage Kubernetes clusters. Certified Kubernetes Administrator (CKA) Program Exam certification is globally recognized and is considered a valuable credential for IT professionals.
The CKA exam is a performance-based exam that assesses the candidate’s ability to perform tasks related to Kubernetes. CKA exam is conducted in a real-world, live environment, where the candidate is expected to demonstrate their skills in configuring, deploying, and troubleshooting Kubernetes clusters. CKA exam covers a wide range of topics, including Kubernetes architecture, installation and configuration, networking, storage, security, and troubleshooting. CKA exam is designed to test the candidate’s ability to design, deploy, and manage Kubernetes clusters in a production environment, making it a valuable certification for IT professionals looking to advance their careers in the field of DevOps and cloud-native technologies.
The CKA Program Certification Exam consists of a set of performance-based tasks that candidates must complete within a given time frame. CKA exam covers a broad range of topics, including cluster architecture, installation and configuration, networking, storage, troubleshooting, and security. Candidates are expected to demonstrate their ability to perform tasks such as deploying applications, scaling and upgrading clusters, configuring network policies, troubleshooting node and cluster problems, and securing Kubernetes clusters.
NEW QUESTION # 15
Create a pod as follows:
Name: non-persistent-redis
container Image: redis
Volume with name: cache-control
Mount path: /data/redis
The pod should launch in the staging be persistent.
Answer:
Explanation:
See the solution below.
Explanation
solution
F:\Work\Data Entry Work\Data Entry\20200827\CKA\13 B.JPG
F:\Work\Data Entry Work\Data Entry\20200827\CKA\13 C.JPG
F:\Work\Data Entry Work\Data Entry\20200827\CKA\13 D.JPG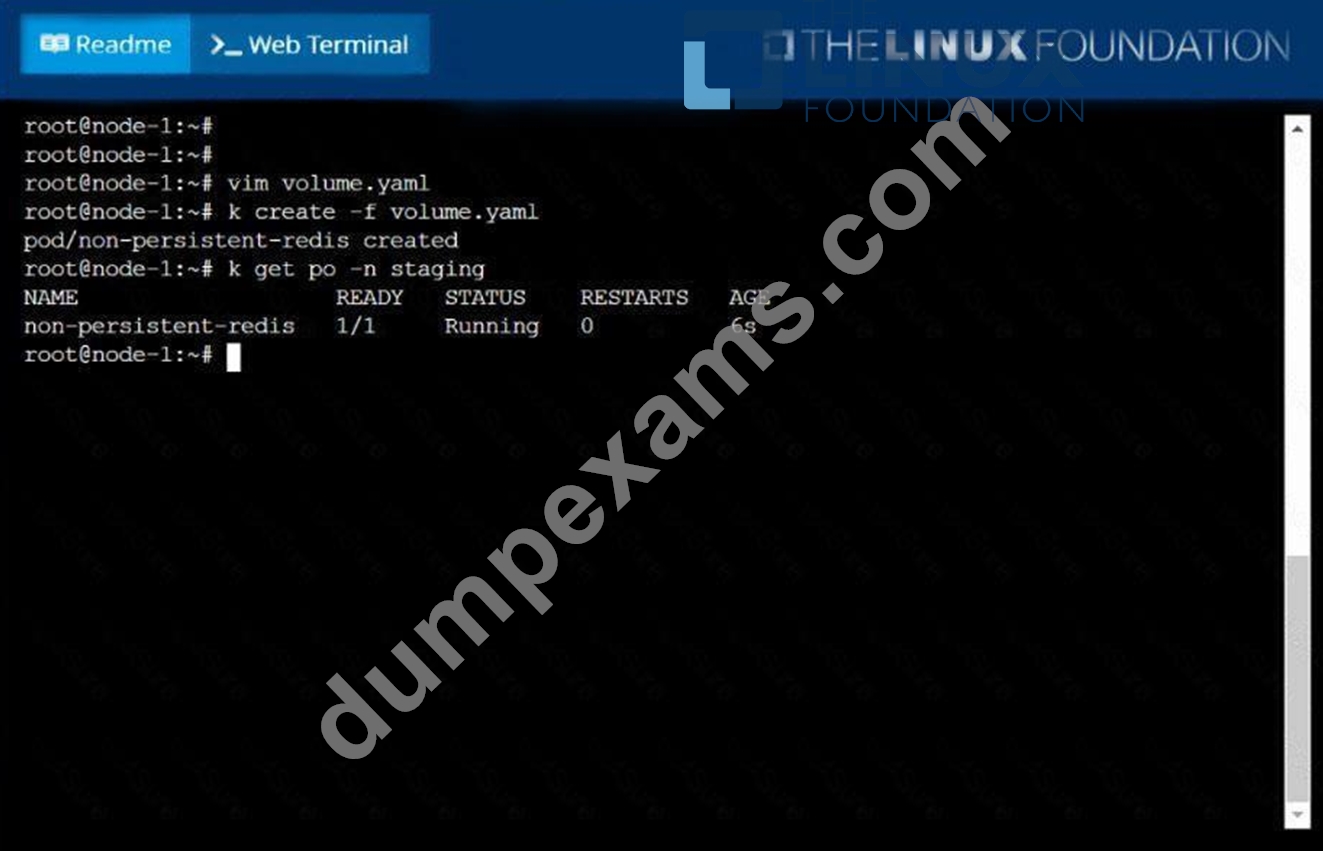
NEW QUESTION # 16
Create a namespace called 'development' and a pod with image nginx called nginx on this namespace.
Answer:
Explanation:
See the solution below.
Explanation
kubectl create namespace development
kubectl run nginx --image=nginx --restart=Never -n development
NEW QUESTION # 17
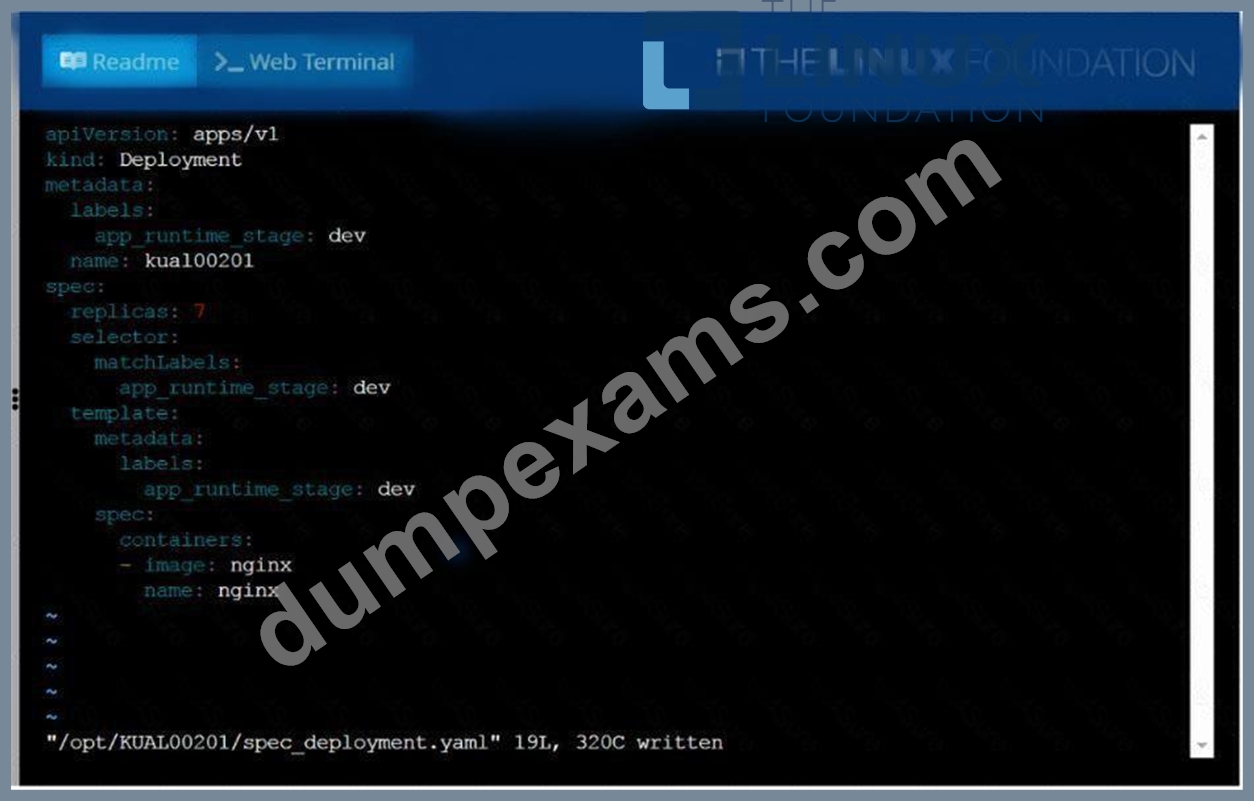
Create a deployment spec file thatwill:
* Launch 7 replicas of thenginxImage with the labelapp_runtime_stage=dev
* deployment name:kual00201
Save a copy of this spec file to/opt/KUAL00201/spec_deployment.yaml
(or/opt/KUAL00201/spec_deployment.json).
When you are done, clean up (delete)any new Kubernetes API object thatyou produced during this task.
Answer:
Explanation:
See the solution below.
Explanation
solution
NEW QUESTION # 18
Create a redis pod, and have it use a non-persistent storage
Note: In exam, you will have access to kubernetes.io site,
Refer : https://kubernetes.io/docs/tasks/configure-pod-container/configurevolume-storage/
- A. apiVersion: v1
kind: Pod
metadata:
name: redis
spec:
containers:
- name: redis
image: redis
volumeMounts:
- name: redis-storage
mountPath: /data/redis
ports:
- containerPort: 6379
volumes:
- name: redis-storage
emptyDir: {} - B. apiVersion: v1
kind: Pod
metadata:
name: redis
spec:
containers:
- name: redis
image: redis
volumeMounts:
- containerPort: 6379
volumes:
- name: redis-storage
emptyDir: {}
Answer: A
NEW QUESTION # 19
Change the label for one of the pod to env=uat and list all the pods to verify
Answer:
Explanation:
kubectl label pod/nginx-dev3 env=uat --overwrite kubectl get pods --show-labels
NEW QUESTION # 20
Create a Cronjob with busybox image that prints date and hello from kubernetes cluster message for every minute
- A. CronJob Syntax:
* --> Minute
* --> Hours
* --> Day of The Month
* --> Month
* --> Day of the Week
*/1 * * * * --> Execute a command every one minutes.
vim date-job.yaml
apiVersion: batch/v1beta1
kind: CronJob
metadata:
name: date-job
spec:
schedule: "*/1 * * * *"
jobTemplate:
spec:
template:
spec:
containers:
- name: hello
image: busybox
args:
- /bin/sh
- -c
- date; echo Hello from the Kubernetes cluster
restartPolicy: OnFailure
kubectl apply -f date-job.yaml
//Verify
kubectl get cj date-job -o yaml - B. CronJob Syntax:
* --> Minute
* --> Hours
* --> Day of The Month
* --> Month
* --> Day of the Week
*/1 * * * * --> Execute a command every one minutes.
vim date-job.yaml
apiVersion: batch/v1beta1
kind: CronJob
metadata:
name: date-job
spec:
schedule: "*/1 * * * *"
jobTemplate:
spec:
template:
- /bin/sh
- -c
- date; echo Hello from the Kubernetes cluster
restartPolicy: OnFailure
kubectl apply -f date-job.yaml
//Verify
kubectl get cj date-job -o yaml
Answer: A
NEW QUESTION # 21
Check the image version in pod without the describe command
Answer:
Explanation:
See the solution below.
Explanation
kubectl get po nginx -o
jsonpath='{.spec.containers[].image}{"\n"}'
NEW QUESTION # 22
Given a partially-functioning Kubernetes cluster, identify symptoms of failure on the cluster.
Determine the node, the failing service, and take actions to bring up the failed service and restore the health of the cluster. Ensure that any changes are made permanently.
You can ssh to the relevant I nodes (
[student@node-1] $ ssh <nodename
You can assume elevated privileges on any node in the cluster with the following command:
[student@nodename] $ | sudo -i
Answer:
Explanation:
See the solution below.
Explanation
solution
F:\Work\Data Entry Work\Data Entry\20200827\CKA\23 C.JPG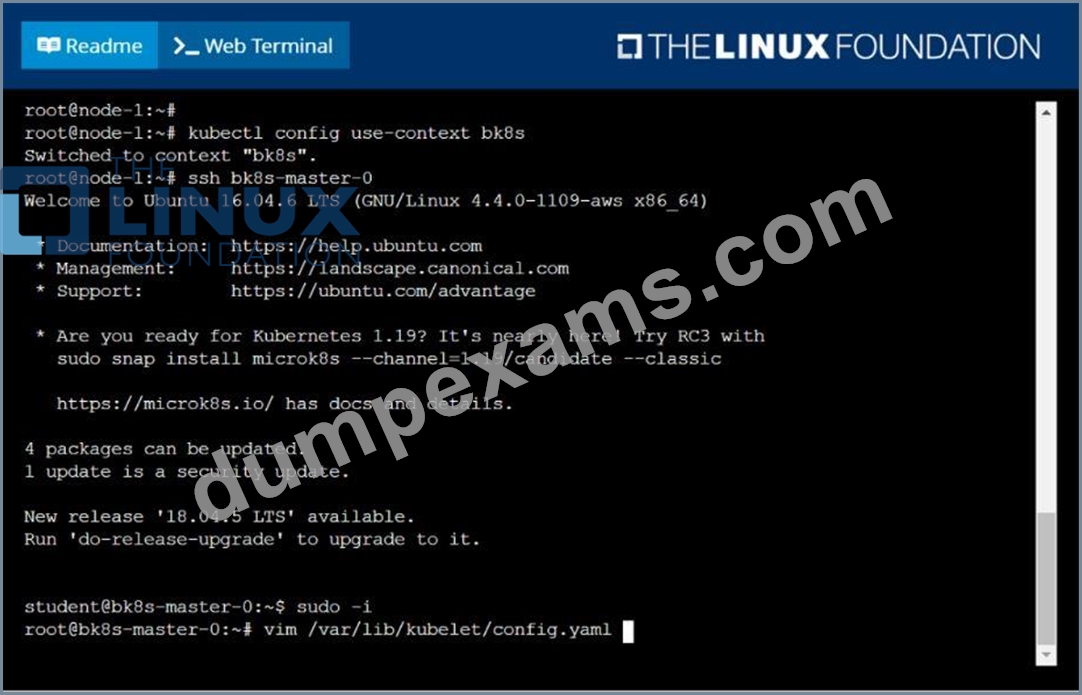
F:\Work\Data Entry Work\Data Entry\20200827\CKA\23 D.JPG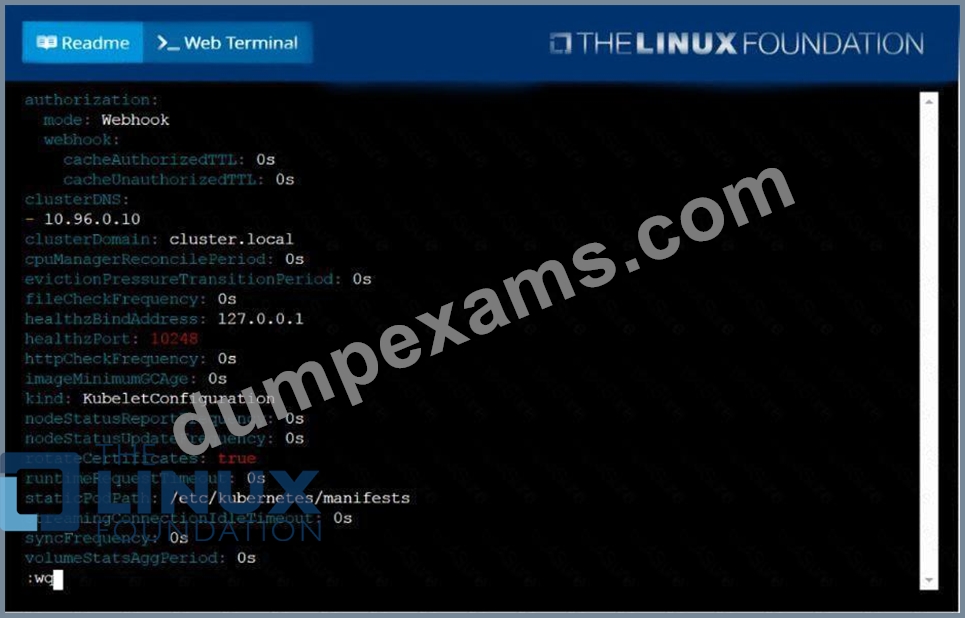
F:\Work\Data Entry Work\Data Entry\20200827\CKA\23 E.JPG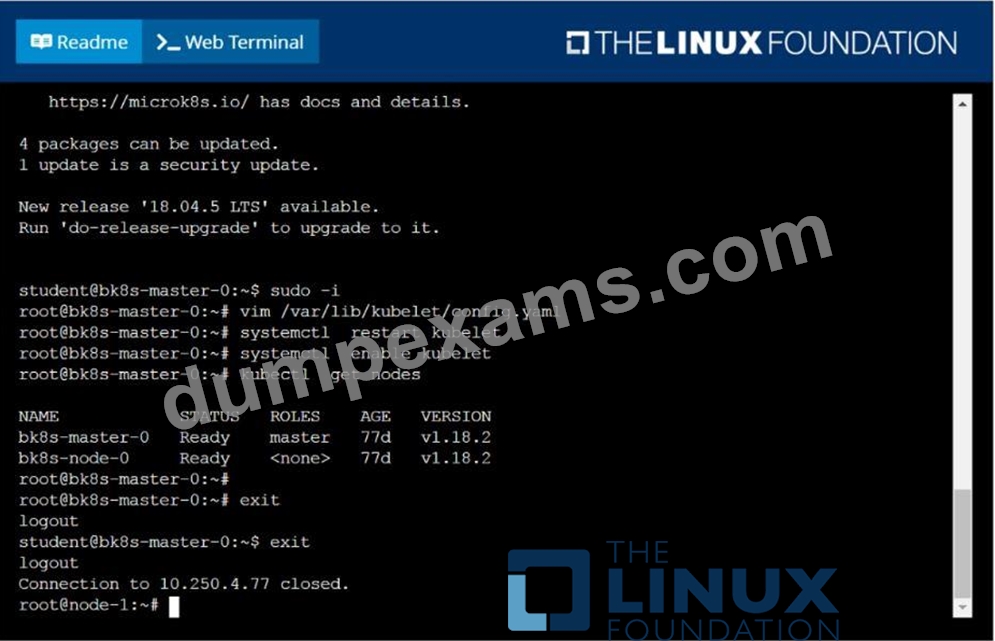
NEW QUESTION # 23
List "nginx-dev" and "nginx-prod" pod and delete those pods
- A. kubect1 get pods -o wide
kubectl delete po "nginx-dev" kubectl delete po "nginx-prod" - B. kubect1 get pods -o wide
kubectl delete po "nginx-dev" kubectl delete po "nginx-prod"
Answer: A
NEW QUESTION # 24
Get the pods with label env=dev and output the labels
Answer:
Explanation:
kubectl get pods -l env=dev --show-labels
NEW QUESTION # 25
Create a redis pod and expose it on port 6379
- A. kubectl run redis --image=redis --restart=Never --port=6379
YAML File :
apiVersion: v1
kind: Pod
metadata:
labels:
run: redis
name: redis
spec:
containers:
ports:
- containerPort: 6679
Rt restartPolicy: Alwaysf - B. kubectl run redis --image=redis --restart=Never --port=6379
YAML File :
apiVersion: v1
kind: Pod
metadata:
labels:
run: redis
name: redis
spec:
containers:
- image: redis
name: redis
ports:
- containerPort: 6379
Rt restartPolicy: Always
Answer: B
NEW QUESTION # 26
Create a pod that echo "hello world" and then exists. Have the pod deleted automatically when it's completed
Answer:
Explanation:
See the solution below.
Explanation
kubectl run busybox --image=busybox -it --rm --restart=Never --
/bin/sh -c 'echo hello world'
kubectl get po # You shouldn't see pod with the name "busybox"
NEW QUESTION # 27
Create an nginx pod and list the pod with different levels of verbosity
- A. // create a pod
kubectl run nginx --image=nginx --restart=Never --port=80
// List the pod with different verbosity
kubectl get po nginx --v=7
kubectl get po nginx --v=8
kubectl get po nginx --v=9 - B. // create a pod
kubectl run nginx --image=nginx --restart=Never --port=80
// List the pod with different verbosity
kubectl get po nginx --v=7
kubectl get po nginx --v=6
kubectl get po nginx --v=9
Answer: A
NEW QUESTION # 28
Get list of all the pods showing name and namespace with a jsonpath expression.
Answer:
Explanation:
kubectl get pods -o=jsonpath="{.items[*]['metadata.name'
, 'metadata.namespace']}"
NEW QUESTION # 29
Set the node named ek8s-node-1 as unavailable and reschedule all the pods running on it.
Answer:
Explanation:
See the solution below.
Explanation
solution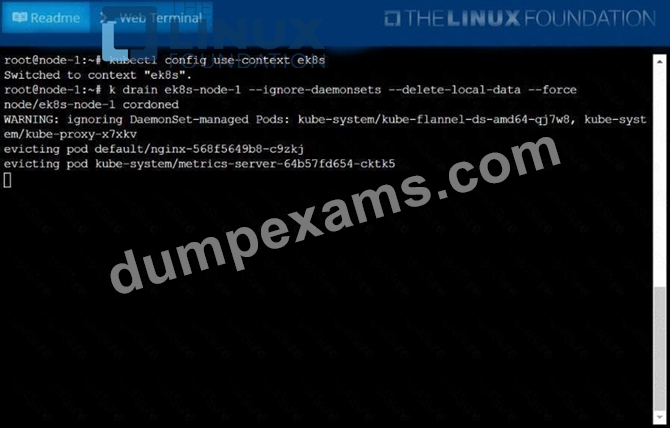
NEW QUESTION # 30
List pod logs named "frontend" and search for the pattern "started" and write it to a file "/opt/error-logs"
Answer:
Explanation:
Kubectl logs frontend | grep -i "started" > /opt/error-logs
NEW QUESTION # 31
Get IP address of the pod - "nginx-dev"
- A. Kubect1 get po -o wide
Using JsonPath
kubect1 get pods
.items[*]}{.metadata.name}{"\t"}{.status.podIP}{"\n"}{end}' - B. Kubect1 get po -o wide
Using JsonPath
kubect1 get pods -o=jsonpath='{range
.items[*]}{.metadata.name}{"\t"}{.status.podIP}{"\n"}{end}'
Answer: B
NEW QUESTION # 32
Create a persistent volume with name app-data, of capacity 2Gi and access mode ReadWriteMany. The type of volume is hostPath and its location is /srv/app-data.
Answer:
Explanation:
solution
Persistent Volume
A persistent volume is a piece of storage in a Kubernetes cluster. PersistentVolumes are a cluster-level resource like nodes, which don't belong to any namespace. It is provisioned by the administrator and has a particular file size. This way, a developer deploying their app on Kubernetes need not know the underlying infrastructure. When the developer needs a certain amount of persistent storage for their application, the system administrator configures the cluster so that they consume the PersistentVolume provisioned in an easy way.
Creating Persistent Volume
kind: PersistentVolume apiVersion: v1 metadata: name:app-data spec: capacity: # defines the capacity of PV we are creating storage: 2Gi #the amount of storage we are tying to claim accessModes: # defines the rights of the volume we are creating - ReadWriteMany hostPath: path: "/srv/app-data" # path to which we are creating the volume Challenge Create a Persistent Volume named app-data, with access mode ReadWriteMany, storage classname shared, 2Gi of storage capacity and the host path /srv/app-data.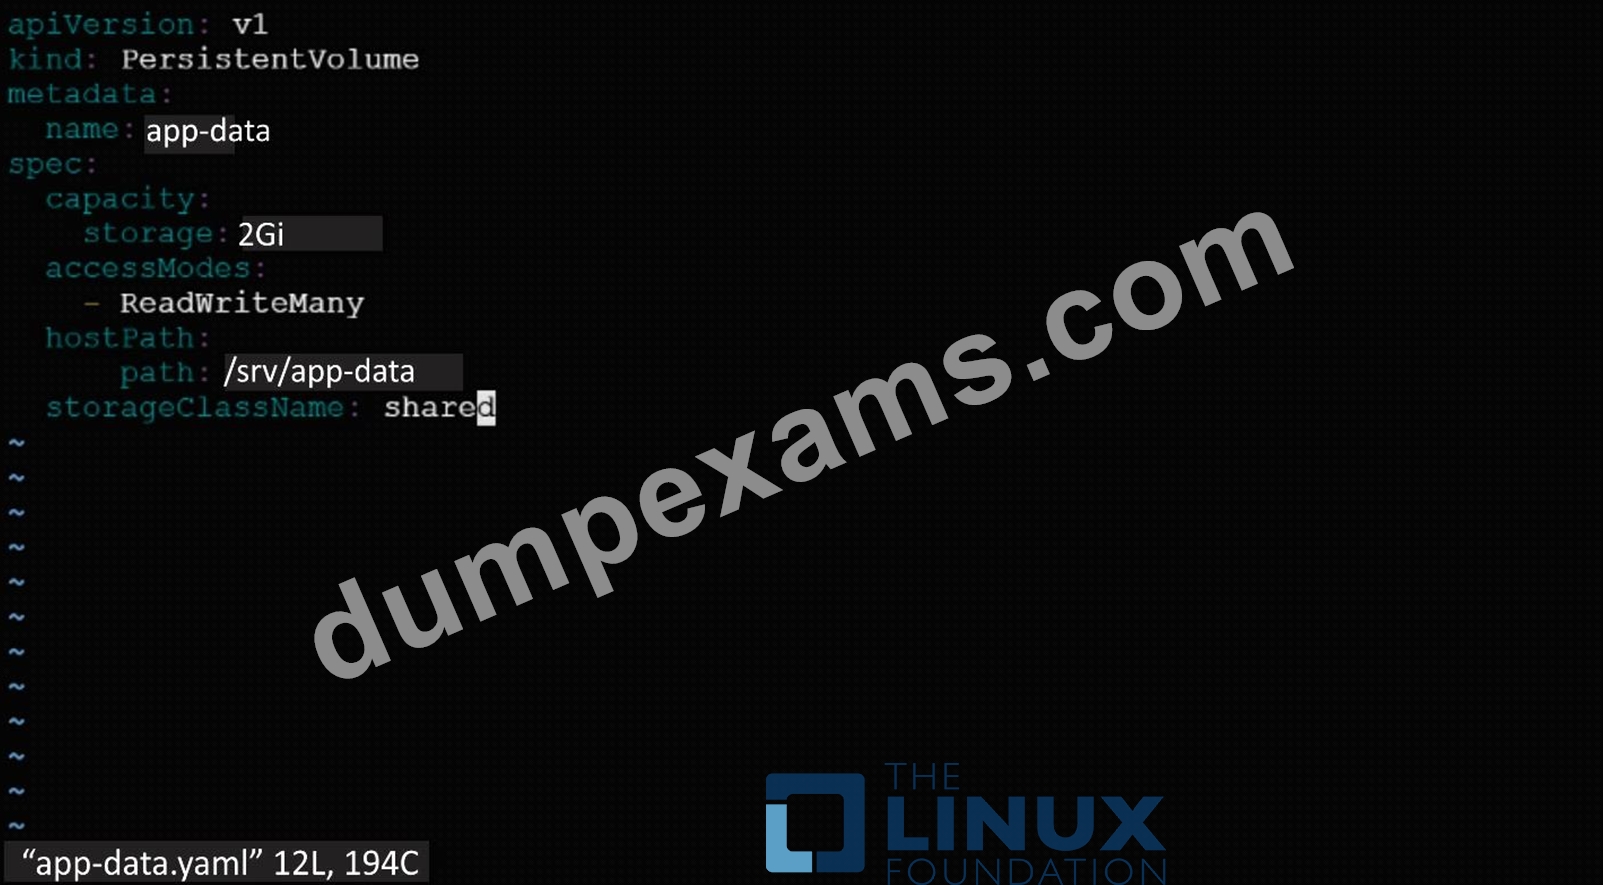
2. Save the file and create the persistent volume.
3. View the persistent volume.
Our persistent volume status is available meaning it is available and it has not been mounted yet. This status will change when we mount the persistentVolume to a persistentVolumeClaim.
PersistentVolumeClaim
In a real ecosystem, a system admin will create the PersistentVolume then a developer will create a PersistentVolumeClaim which will be referenced in a pod. A PersistentVolumeClaim is created by specifying the minimum size and the access mode they require from the persistentVolume.
Challenge
Create a Persistent Volume Claim that requests the Persistent Volume we had created above. The claim should request 2Gi. Ensure that the Persistent Volume Claim has the same storageClassName as the persistentVolume you had previously created.
kind: PersistentVolume apiVersion: v1 metadata: name:app-data
spec:
accessModes: - ReadWriteMany resources:
requests: storage: 2Gi
storageClassName: shared
2. Save and create the pvc
njerry191@cloudshell:~ (extreme-clone-2654111)$ kubect1 create -f app-data.yaml persistentvolumeclaim/app-data created
3. View the pvc
4. Let's see what has changed in the pv we had initially created.
Our status has now changed from available to bound.
5. Create a new pod named myapp with image nginx that will be used to Mount the Persistent Volume Claim with the path /var/app/config.
Mounting a Claim
apiVersion: v1 kind: Pod metadata: creationTimestamp: null name: app-data spec: volumes: - name:congigpvc persistenVolumeClaim: claimName: app-data containers: - image: nginx name: app volumeMounts: - mountPath: "/srv/app-data " name: configpvc
NEW QUESTION # 33
Score: 4%
Task
Scale the deployment presentation to 6 pods.
Answer:
Explanation:
Solution:
kubectl get deployment
kubectl scale deployment.apps/presentation --replicas=6
NEW QUESTION # 34
......
CKA Exam Dumps - Free Demo & 365 Day Updates: https://www.dumpexams.com/CKA-real-answers.html
Free Sales Ending Soon - Use Real CKA PDF Questions: https://drive.google.com/open?id=1oSj-_E-kNJ_G8dvFi34DBLFkL23KFdoX